
1 Comments
10 Cards 1 Kit- Harvest Blessings Deluxe Fall Card Kit
Fall is approaching in exactly one month, which means it's time for Fall card making! Today, I created 10 beautiful autumn cards using the new Scrappy Tails Harvest Blessings Deluxe Fall card kit.
Kit Breakdown

Our Harvest Blessings Deluxe Fall card kit is an amazing value at $85 for only $59.95!
- Scrappy Tails "Harvest Blessings" 6x6 pattern paper pad ($7.95)
- Scrappy Tails "Wild Sunflowers" 6x6 stamp set ($21.95)
- Scrappy Tails "Wheat" die set ($14.95)
- Scrappy Tails "Layering Sunflower" stencil set of three ($17.95)
- Scrappy Tails "Layering Sunflower" coordinating die ($19.95)
- Scrappy Tails "Sunflower" pearl mix ($3.75)
I also want to mention that I always try limit my supplies as much as possible when it comes to using card kits. However, I did decide to use the coordinating dies for the "Wild Sunflowers" stamp set to save time and fussy cutting stress LOL.
Video Tutorial
See how each of these cards came together in my video tutorial above.
Be sure to leave your comments for a chance to win one of these amazing card kits. I will announce the winner on the Scrappy Tails Youtube channel and blog September 2nd!
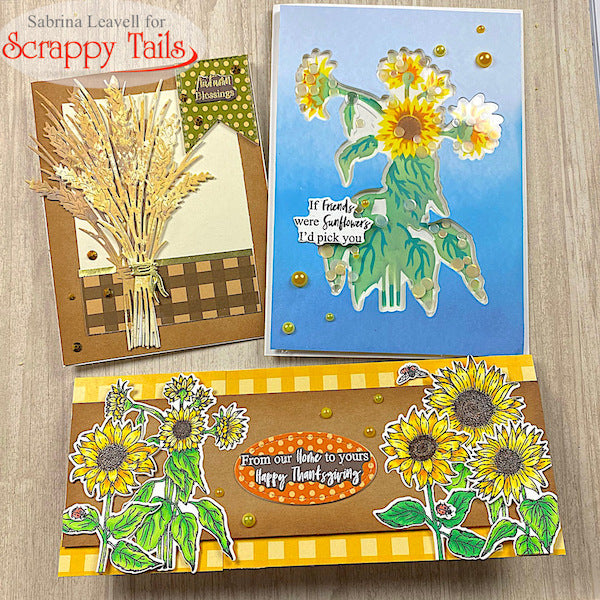
Card One

Whenever I work with card kits, I like to do my stamping, coloring and die cutting before I start building my cards. This saves time and allows me to grab different die cuts from a large pool of images to create my cards. I also die cut additional solid white die cuts to go behind my colored images. This adds extra dimension and saves money on foam tape!
For card one, I grabbed every sunflower and lady bug from the stamp set to create two flower clusters on the right and left side of my card.
I glued each flower (some popped up) onto a kraft panel. On the edges of the panel, I inked "Vintage Photo" Distress ink.
On the top and bottom of the card base, I glued two strips of yellow gingham pattern paper. I popped up my kraft panel in the center with foam tape. In the center of the kraft panel, I die cut an oval from the orange polka dot pattern paper and added my white heat embossed sentiment on top.
This card was finished off with a scattering of pearls from the kit.
Card Two

Card two happens to be my favorite, I love the pattern paper I used! I started by die cutting a wide frame from the leaf pattern paper using two nested rectangle dies. Behind it, I added acetate and a double layer of foam tape.
I flipped the smaller rectangle I cut from the frame over, and glued it onto my card base. On top, I glued one of my sunflower images and scattered my fall sequins. Then, I sealed the shaker with my acetate frame.

On top of my frame, I glued two more sunflowers and a sentiment.
Card Three

Now let's feature a card with that beautiful layering sunflower stencil. I used "Bundled Sage", "Pine Needles", "Squeezed Lemonade", "Mustard Seed", "Wild Honey" "Vintage Photo and "Walnut Stain" Distress oxide inks to blend through each layer of the stencil.
This set comes with three stencils, but you actually get four layers to this image! I absolutely love how this image turned out and it's a nice bonus to have the coordinating die included in the card kit!

The background of this card was created using the "Wild Sunflower" 6x6 stamp set. I stamped the sunflowers and lady bugs with "Frayed Burlap" Distress Oxide ink onto a cream panel. Around the edges of the panel I ink blended "Vintage Photo" Distress ink.
Behind my stenciled die cut, I added three solid white die cuts behind it to pop it up. To mute the background, I adhered a vellum oval to the center of my stamped panel. Then, I glued my stenciled image, my sentiments and a few pearls.
Card Four

So far we have a different card base for each card, why not continue that with a mini slimline card?! This one features the beautiful wheat die. I cut it once from gold, twice from heavy weight white and once from cream. Behind the gold wheat, I glued my 2 heavy weight white die cuts for extra dimension. Then, I glued my gold wheat on top of the cream one, slightly offsetting the two colors to create a fuller bouquet.
In the center of the wheat, I added two stamped sunflowers. I didn't want any green on this card, so I chose to cut the stems off of them. I also added a red tie.

I adhered the bouquet onto an orange polka dot card panel. To the bottom of the panel, I added a strip of brown gingham pattern paper. Between the two papers, I added a kraft twine bow. I love the rustic charm this added!
I finished the card off with a gold heat embossed sentiment and a scattering of pearls. (By the way, the "Wild Sunflowers" coordinating die set does cut out the sentiments!)
Card Five

Venturing a little bit away from the color scheme, I decided to create a brighter card with blue Distress Oxide inks. Blue is orange's complimentary color, so I thought it was a good idea!
I ink blended "Stormy Sky" and "Tumbled Glass" to the bottom of a light blue slimline card panel.
I arranged a row of sunflowers going across the bottom of the card. I used the largest image from the stamp set four times, staggering the heights so they don't all look the exact same. Above the sunflowers, I added my sentiment and a flying lady bug.
Instead of using pearls as a final embellishment, I decided to use more lady bugs!
Card Six

I'll be honest, at this point, I ran out of colored images. I decided why not change it up and use my colored pencils on kraft card stock to color another sunflower image? I love this technique because the kraft will mute the colors slightly and create a vintage look.
After coloring the image, I die cut the card stock with a stitched rectangle die and inked around the edges with, you guess it, "Vintage Photo" Distress ink.

Behind the kraft rectangle, I adhered two white ones behind it for extra dimension.
The background was created with cream card stock and square tiles that I cut from some of the pattern paper included in the kit. Around the cream panel, I inked the edges with "Vintage Photo Distress Ink".
I glued my sunflower image right in the center and adhered everything onto a kraft card base. (Yes, I inked the edges lol).
Card Seven

Card seven is definitely the most simple design. The "Harvest Blessings" paper pad includes a gorgeous sunflower scene paper. I decided to cut it to 5.25 x 5.25'. I took another sheet of the same design and fussy cut around the sunflower cluster and sentiment. I added foam tape and popped both pieces above the same images on my square card panel with foam tape.
Before popping up my sentiment, I did decide to back it with a dark brown card stock. This allowed it to stand out more.

On the bottom of the card panel, I added another twine bow, and mounted it onto a dark brown card base. Finally, I embellished with a few pearls.
Card Eight

Let's create another pretty blue card! This time using another stenciled sunflower. I thought it would be fun to use it's coordinating die to create a shaped shaker window.
I started by ink blending "Stormy Sky" and "Tumbled Glass" onto the bottom of a light blue A7 card panel. Once dry, I used the layering sunflower coordinating die to cut the center out.
I then cut 5 heavy weight white card panels to the same size as my blue panel (4.75x6.75') From the center of each, I cut the layering sunflower coordinating die. Once they were all cut, I stacked all 5 panels together to build the shaker walls.

To the center of my A7 card base, I glued my stenciled sunflower image. Then I sprinkled an iridescent sequin mix over the flower.
Behind the blue panel, I glued acetate and the thick white piece. Then, I carefully glued the entire piece over my stenciled sunflower image. The coordinating die is a bit wider than a traditional one, so it was easy to do this.
To finish off the card I added a sentiment and a scattering of pearls. This one turned out so elegant!
Card Nine

I didn't have the perfect "wheat" color in my stash, so I decided to create my own with an artistic touch using the 'ink smooshing' technique. On my glass mat, I squished some "Scattered Straw and "Frayed Burlap" Distress Oxide Inks. I spritzed some water on them and dipped my paper into the inks. For more solid coverage, you can drag your paper. For more speckles you can dab your paper.
I created two wheats, one with more "Scattered Straw" mixed, and one with more "Frayed Burlap" mixed. Once dry, I used the same inks and a paintbrush to splatter the card panel.

I offset the two wheats to make it look fuller. On the lighter wheat, I adhered a gold tie. On a cream card panel, (3.75x5') I adhered a brown gingham strip. Between the two colors I added a strip of gold mirror card stock. Then, I adhered my wheat and glued the entire panel to a kraft card base.
On the top right, I added a banner which I die cut from the green polka dot pattern paper. On the banner, I adhered my gold heat embossed sentiment.
This card was finished off with a scattering of brown gems.
Card Ten

I felt the pattern paper needed a little more love, so I decided to use the bold sunflower paper for my last card. I cut it to 4x5.25'. I cut an orange polka dot paper to 3.5x4.75' and added a green polka dot strip to the bottom. I matted it onto a dark brown matte that is 1/8' bigger.
In the center of the panel, I adhered a single sunflower image. Since the paper is so whimsical, I decided to add a large pearl to the center of the sunflower.

For my sentiment, I die cut a circle from the yellow gingham pattern paper. In the center, I added my sentiment. Then, I matted the circle with a slightly larger dark brown scalloped circle and embellished the card with some pearls.
That finishes off my cards today, thank you so much for stopping by!
-Sabrina
1 Comments
All your cards were beautiful and very inspirational…. You mention in the video that you colored all the sunflowers the same and there was a link to how you colored them but I can’t seem to find it. Can you tell me which one it is? I’m going to duplicate some of your cards because I love them so much. Thanks for all the inspiration.