3 Comments
4 Horror Classics Book Cards
Hello foolish mortals! Today, I decided to do a blog for my very long video tutorial that features four pop up book cards that I made with our new "Horror Classics" bundle. I wanted to share some close-up photos since there’s so much amazing detail on each of these cards.
Video tutorial
All of the book bases were created with our super popular "A7 Pop up Shadow Box Book" die set. To see how a book is assembled, be sure to watch my video tutorial above.
Frankenstein


I carried the colors from the front of the card to the inside. The inside cover page has a green panel with a black ornate frame, and a yellow oval in the center. I also added some bats, Frankenstein’s castle, and a sentiment.

Dracula


The inside cover page features the same ornate frame and another decorative oval frame. The oval inside the frame was cut from red and accented with Dracula’s castle.

The shadow box features another ornate oval frame with Dracula in the center. He comes in the “A7 Dracula Cover Plate” die set. The shadow box frame was further accented with another gold book frame to match the left side. Out of all of the book designs, this one definetely feels the most “classic”.
The Raven

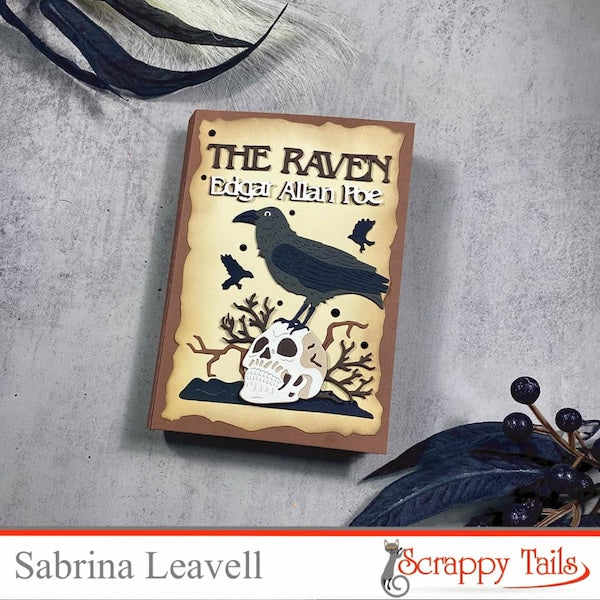
The Raven was a lot of people’s favorite classic featured in the bundle, and I absolutely LOVE how this one turned out! The cover was completely made with our new “ Raven A7 Cover Plate” die set. I followed the colors on the back of the packaging, but slightly changed the composition of the die cuts.
I tucked some additional branches behind the skull and grounded it with some black dirt. Finally, I accented the cover with some black gems.

I kept the inside cover page very simple with another distressed panel, and a Nevermore die cut at the top.

Spellbook

That leaves us with the final design, a spell book! I made the front cover with some bright pink and purple patterned paper, and die cuts from our new “A7 Spell Book Cover Plate” die set. I decided to add a fun shaker to the front label. The shaker bits inside are from our new “Witch Party” embellishment mix. I opted to create my shaker with several layers of cardstock vs. foam tape for a cleaner look.


The shadow box scene was made with a few different die sets including our “Pick your Poison”, “Pumpkin Kitties” and our “Dancing Witches” die sets. I also included another cauldron from the “Spell book Cover Plate” die set. I arranged all of my die cuts to create a fun witch’s lair scene. I also opted to decorate the shadow box with more brightly colored patterned paper. Several of my die cuts are accented with glitter card stock to add that fun shine to the witches!
Thank you so much for checking out my video and coordinating blog. Stay tuned for more spooktacular projects coming soon!

3 Comments
These are novels I must have for my library collection for sure! All best sellers! Boo
What elements or characters are included in these die sets?
Visit us Online Learning