
6 Comments
Hero Arts October 2020 | 10 Cards 1 Kit | Part 1
Video Tutorial
Close Ups

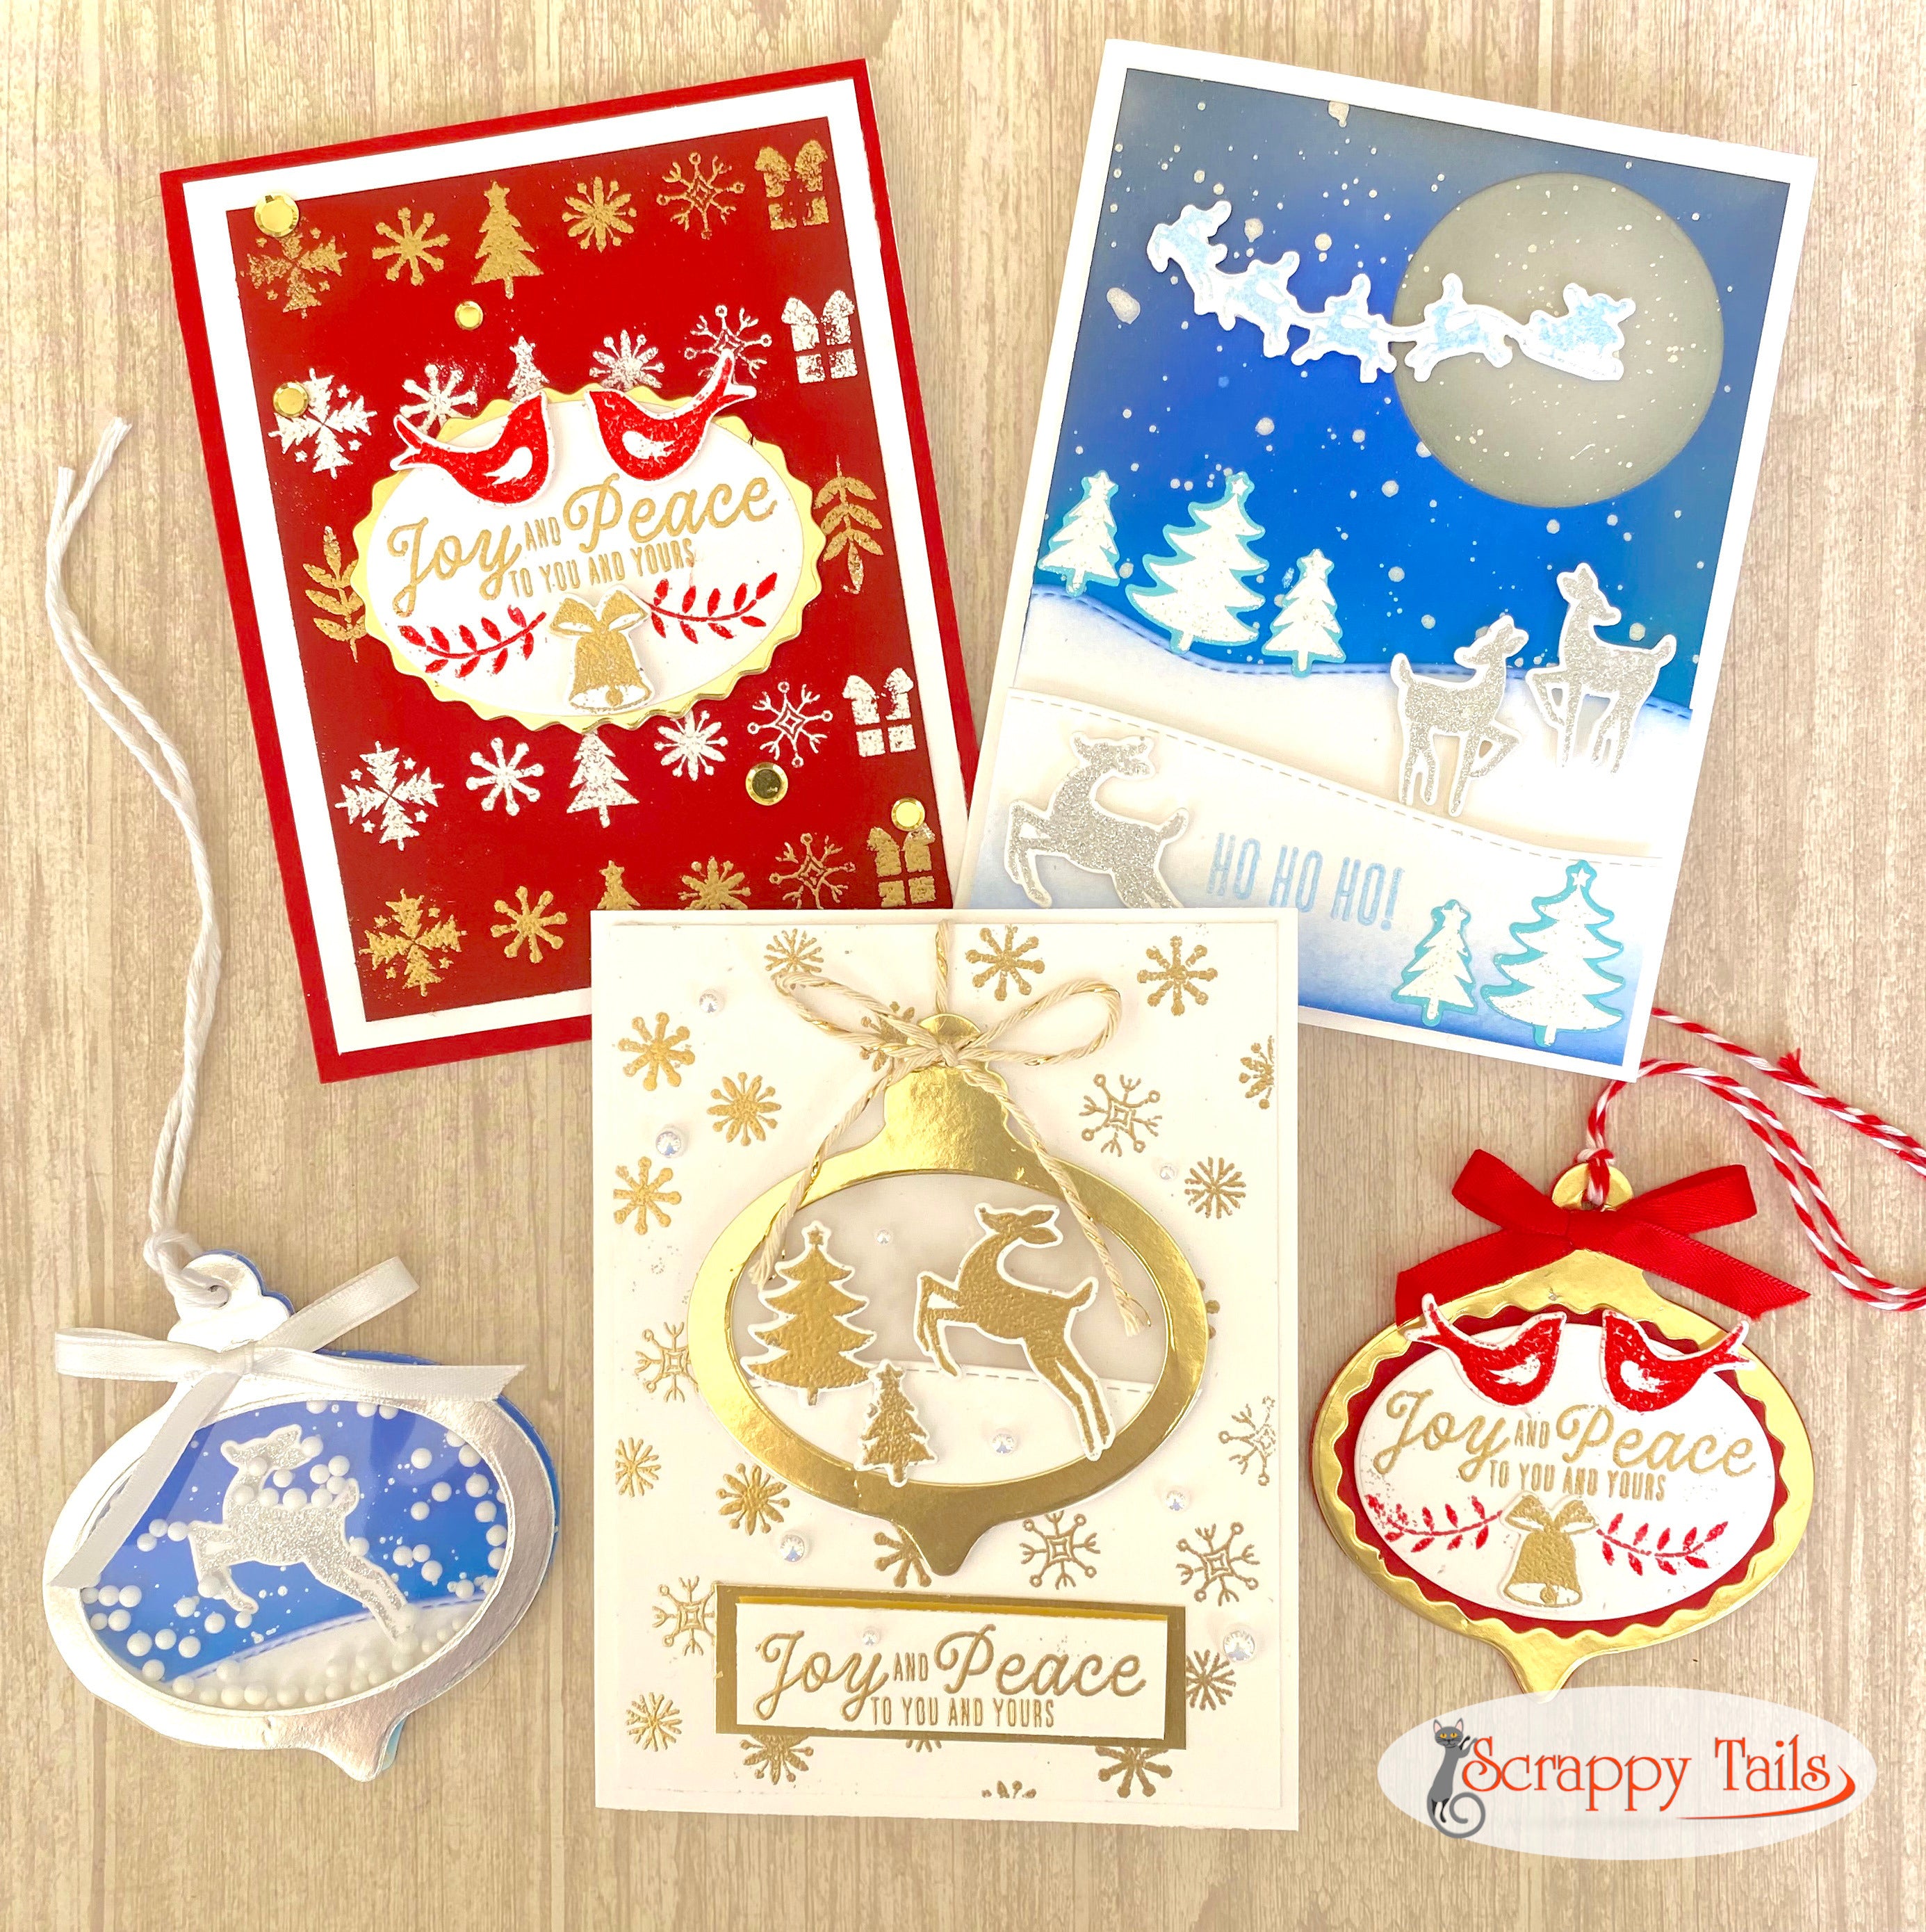
Because the kit included a bonus ornament tag die, I decided to created a coordinating tag for each of my cards. I love creating tags almost as much as card making, and I love to match my gift tags with my handmade cards. What's great is, the supplies you used for your card design are already out, so it's nice and easy to use the same supplies to create a coordinating tag!

For card one, I created a heat embossed background using some of the Christmas icon stamps from the stamp set. I stamped them out side by side in a row inside my MISTI. I was able to create the background by shifting my red card panel upwards inside my MISTI. This ensured that each row of images were perfectly stamped in the same position and were equally spaced apart.
For all 10 cards, I used the clear sticky ink that came in the kit for my stamping. I wanted to do some selective heat embossing, so I added my gold embossing powder to the top and bottom rows. I added white embossing powder to my center rows. Once everything was heat set, I went around the edges of the red panel with my vintage photo distress ink. This added some nice interest and helped to frame the panel. This background sort of resembles a sweater pattern, which is what I was going for!
The focal point was created with the two oval dies that come with the ornament tag. I gold heat embossed a sentiment from the kit on a white die cut oval. I red embossed two leafy branches below the sentiment to add a decorative touch. By the way, the red embossing powder is included in the kit! Above my sentiment, I added the two birds facing each other, both birds were red heat embossed. Between the two red branches, I added a die cut bell, which I gold heat embossed. To help the white oval pop, I added a gold wavy oval matte behind. I popped up my two ovals to help it stand out from the background. Finally, I sprinkled a few gold sequins around the card panel and matted it onto some white and red card stock!


For my coordinating tag, I die cut two solid ornaments from red card stock. For the front of my tag, I added a gold ornament frame on top. The frame was created by die cutting the solid ornament from gold mirror card stock and cutting the wavy oval from the center. The white oval on the tag was created the same way the white oval on the card was created. I decided to pop it up with foam tape. The back of the card is fairly simple. I just gold heat embossed another sentiment with a bird image on top. I also added a gold topper.

For my second set, I created the skies with Salty Ocean, Blueprint Sketch and Black soot distress oxide ink. To create some snow in the background, I splattered on some pearlescent watercolor. The moon on the card was created with a circle die cut from grey card stock. I added the left over black ink on my blender brush around the moon to add some dimension. I added the left over blue ink on my brush to the snowbanks. I thought it made the snow glow in the night sky!

I was excited to create an entire scene using embossed images. I die cut the trees from light blue card stock and white heat embossed them. The flying santa and "Ho Ho Ho" sentiment was embossed with the light blue embossing powder that came in the kit. The deer were embossed with silver glitter embossing powder.


This is an example where the coordinating tag wasn't a direct copy of the card. This tag was more inspired by the card. I used the same distress oxide inks and pearlescent watercolor for the front and back of the tag. In the center of the ornament, I added another snowbank and prancing deer, which I silver heat embossed. I made the tag into a shaker, using a silver ornament shaker frame. The cute snowball shaker bits inside the shaker, came from Hobby Lobby. I left the back of the tag simple by white heat embossing the sentiment and adding a silver topper.

White and gold is such a classic Christmas color scheme. For this set, I created the same background on the card panel and tag. The backgrounds were created by gold heat embossing the snowflake stamps from the stamp set.

For card three, I wanted to showcase the ornament die on a card. I decorated the ornament with a gold mirror frame, and a cute little scene with a prancing deer and trees, which were gold heat embossed. For the ornament backer, I went with two layers of vellum. This allowed the snowflake pattern to subtly peek through. I added a snowbank to the bottom of the ornament and popped it up with foam tape. The sentiment was gold heat embossed and layered on top of a gold matte. The card was embellished with pearls. I added a twine bow to the top of the ornament.


For my coordinating tag, I glued a gold heat embossed prancing deer to the center of the ornament. To match the card, I added a gold frame around the snowflake background. For the back of the tag, I gold heat embossed a sentiment onto a vellum circle. To finish off the tag, I embellished the front and back with pearls.

We are on to my favorite set! I love how three ornaments fit perfectly onto a slimline card. As you can see, the coordinating tag is the exact same as the two light blue ornaments on the card!


I believe this card design and tag would be great for Hanukkah! The three light blue ornaments were created with stamps from the stamp set and white, navy blue and silver glitter embossing powders. If you're curious to see how I embossed everything, definitely check out my video where I show a trick for selective embossing! You can add even more colors if you want. To save time, I suggest die cutting your ornament from white card stock and stamping your images with various colored inks! The center ornament was die cut from navy blue card stock. I white heat embossed a sentiment in the center of the ornament. The leaves above and below the sentiment were silver glitter embossed. For the ornament on the card, I added a silver frame around the sentiment to help it pop! I glued the two light blue ornaments flat onto a snowflake embossed panel with my glue. The center ornament I popped up with foam tape. To embellish the card and tag, I added some silver rhinestones and white nuvo drops.

I wanted to share that this kit is great for creating masculine and rustic Christmas cards. I love the neutral color scheme and the sweater pattern I was able to achieve with the stamps from the kit. I may have gone a little crazy with my embossing powders but I think that both the tag and the card still turned out really nice!

As I was working with this kit, I grew to really love the selective heat embossing technique. I love that I was able to pull out my lesser used embossing powders to create some beautiful shiny and glittery cards. This card is no exception. I used strips of green and kraft card stock to showcase a new row of patterns that I created with the stamps in the kit. The card is symmetrical, so I started by red heat embossing the skinny kraft strips at the top and bottom of the card. The green strips showcase the large and small trees from the stamp set. The trees were cut from kraft cardstock and embossed with gold and green embossing powders. I offset them to create a fun two toned pattern. The center kraft strip features red, gold, green and white embossing powders. Like I said, I went a little crazy with my powders! This strip was completely done with the selective embossing technique, definitely check out the video if you're curious to see how the technique is done! This card was finished off with a few pearls, I didn't add to many as it is a very busy patterned panel.


Sometimes simplistic is better. In fact, this tag is my favorite out of all 10 tags that I created. I love the rustic kraft color mixed with the red, green and gold embossing powders. The front of the tag was created with the selective embossing technique. The back I left even more simple by just heat embossing a "to" and "from" section that I created with the stamps in the kit. As usual, I added a gold topper to the front and back of the tag. I also scattered a few gold sequins to add some shine.
6 Comments
I would like to purchase the 2020 Christmas by Hero arts, cannot find where to order site?
Your cards are always so beautiful. I love your tutorials because you are so creative. Thank you for your inspiration and creativity!
BQlUPvIuJVSys
eEDcbxdAL
Sabrina, I enjoy watching your tutorials because you complain on that you aren’t that sure of what you are going to do, or that you are running out of ideas, but you end up making beautiful cards or tags. You are very talented since you have been making cards for years. You are someone that we can feel proud of. God Bless you and continue because soon you will be a huge craft busIness woman.